Powerwall
A powerwall is a large, ultra-high resolution display which displays stereoscopic 3D images. Coupled with a tracking system, it provides an immersive virtual reality experience.
Prerequisites
-
Deck / XRCenter - To launch Skyreal VR in powerwall / cave mode you need to launch it through Deck that you must have previously configured
-
VRPN - Virtual-Reality Peripheral Network (VRPN) is a device-independent, network-based interface for accessing virtual reality peripherals in VR applications.
-
Interaction Devices - To interact with Skyreal VR in Powerwall mode, interaction devices are needed. They must be tracked by the ART captors and have preset buttons execute actions in Skyreal VR (navigate, use commands …).
We recommend you use the VenomX device, which has enough buttons and on which reflective balls can be added to track the device.
VRPN Configuration
VRPN can be used to receive input and tracking data from different devices. You need to edit the VRPN config file vrpn.cfg to specify which devices to listen to.
For example, to receive tracking data from ART using DTrack, you need to add a DTrack device as well as the port used by DTrack to send data (port 5000 by default).
In VRPN, the VenomX device is managed as a gamepad. Hence, if one or more VenomX are used, a vrpn_XInputGamepad must be added too.
vrpn_Tracker_DTrack DTrack 5000
vrpn_XInputGamepad XInput0 0
vrpn_XInputGamepad XInput1 1
The StartServer.bat (located in the VRPN directory) launches the VRPN server as configured in vrpn.cfg
The StartTest.bat (located in the VRPN directory) can be used to check which data is being received by the server.
NDisplay Configuration File
The .ndisplay configuration file is used to configure you room setup, such as the different device and screens, their position, etc.
As of Unreal Engine 5.0, this configuration can now be done visually in the Engine for an easier setup. To do so, either create an empty Unreal Engine project and enable the NDisplay plugin or just use the NDisplay Starter Project. Then, create an asset of type nDisplayConfig

You can then open this asset to edit your config.
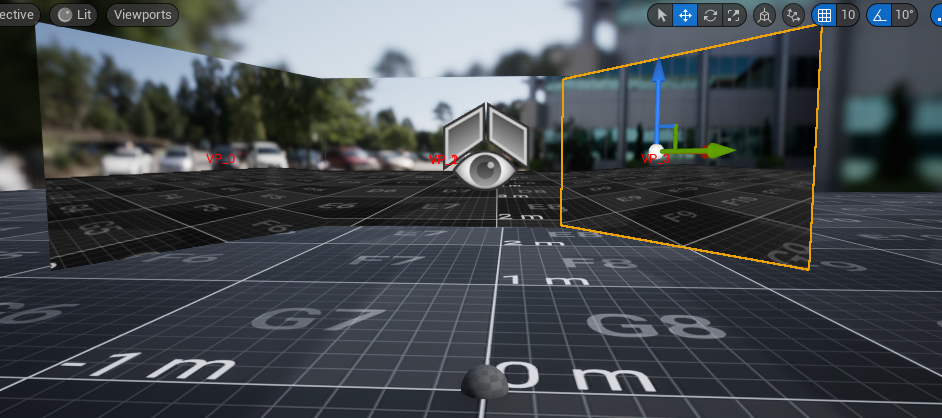
Screens
In the top part of the screen, this is where you will setup the configuration of your screens. Select the nDisplayScreen you want to edit.
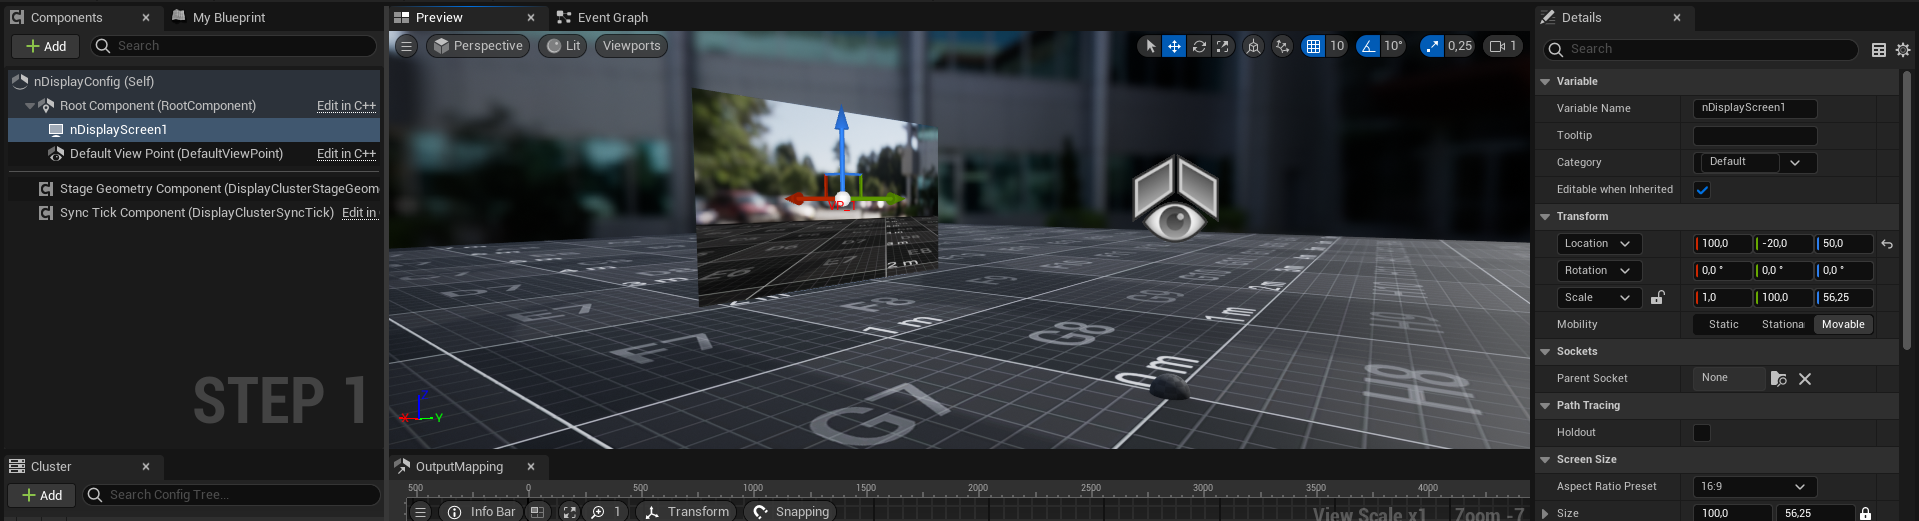
You can then change the size of the screen using the scale parameter : Y value represents the screen width, and Z value the screen height, both are in centimeters. You can also move and rotate the screen around using the gizmo or the location parameter : the goal is to measure the physical distance between the screens and the tracking origin and to replicate it in ndisplay.
Create new nDisplayScreens and repeat this step for as many screens as you have :
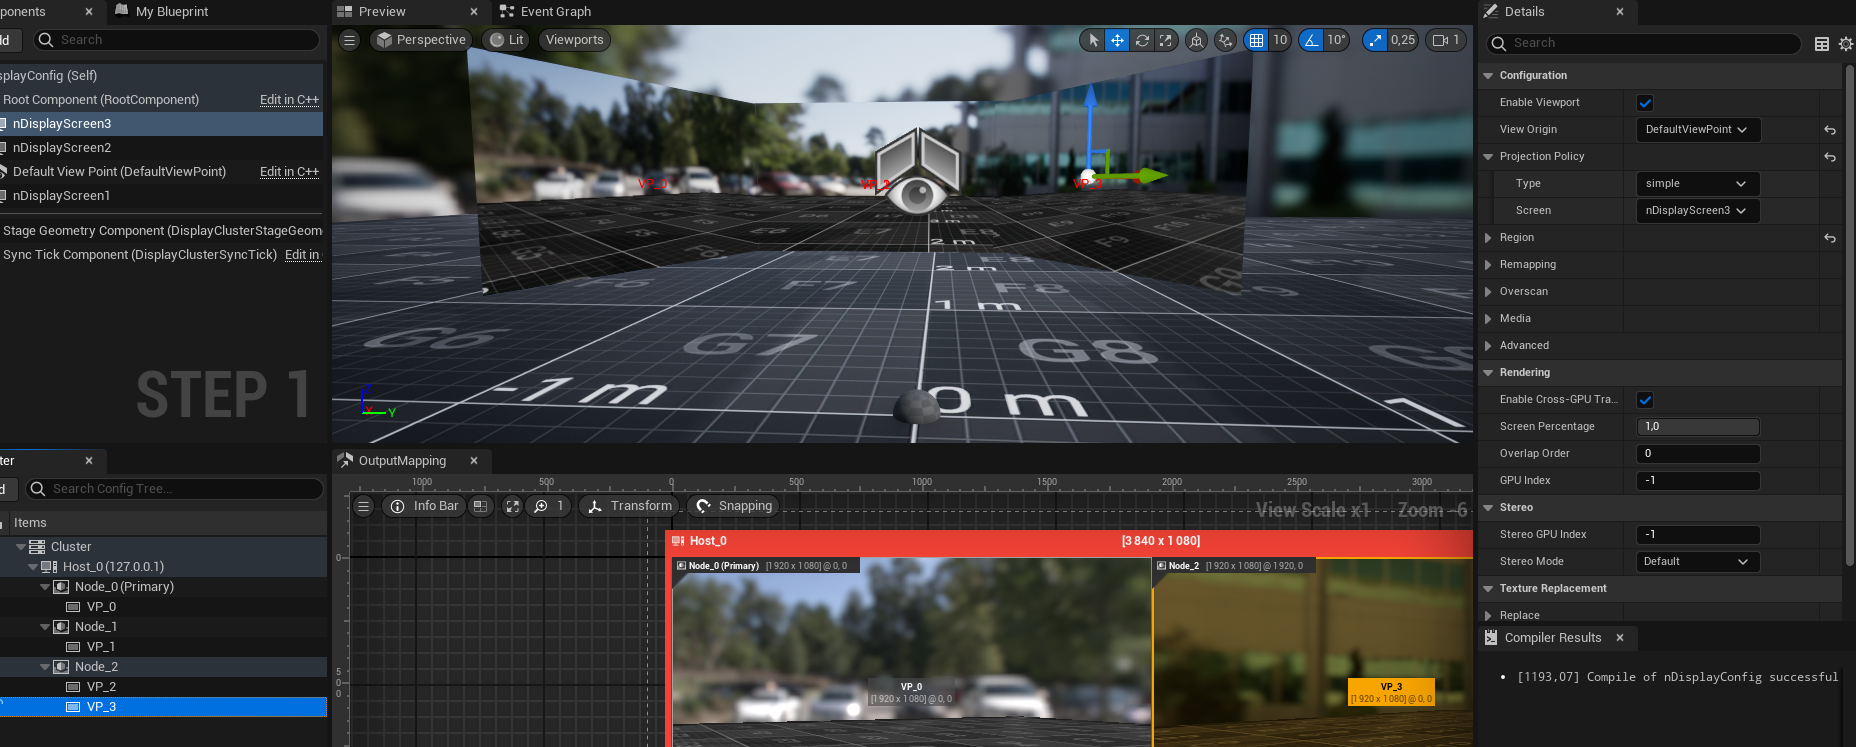
Cluster nodes
In the bottom part of the screen, this is where you can setup your cluster nodes. Cluster nodes are the computers on which your powerwall will run.
You can set settings such as node name, Host IP address, window size, ...
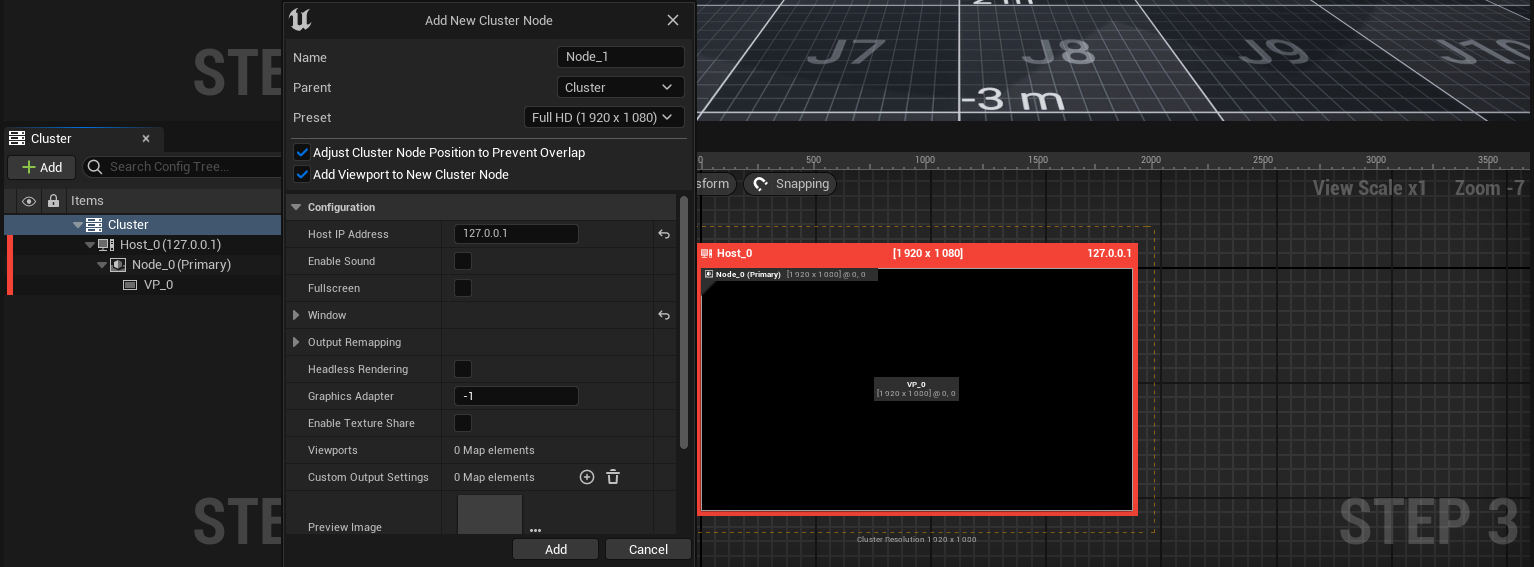
Your newly created node will now contain a viewport by default. You can also decide to have multiple viewports per cluster node. To receive an image on your viewport, you need to change the settings as follow :
Set ViewOrigin to DefaultViewPoint Set ProjectionPolicy - Type to simple For the Projection Policy - Screen setting select which nDisplayScreen your node will render.
You can also read the detailed Unreal documentation here nDisplay 3D Config Editor in Unreal Engine | Unreal Engine 5.2 Documentation to help you setup your ndisplay config file.
When you are done, click export at the top of the window to export your config as a .ndisplay file. This file is viewable as text so you can also edit it manually. If you want to edit your config in the editor again, either save your unreal project or use the import button in the ndisplay config editor to retrieve the config from a saved .ndisplay file.
Skyreal VR VRPN Config File
You also need to setup a .json @TODO Link To Example file here file to configure how your trackers and inputs will behave inside Skyreal VR. Here's how to configure it :
Settings written in bold are required , while settings in italic remain optional.
The first setting needed is APIVersion : this setting is mandatory to know the version of the config file, as of now the version is 1.
The second setting is UpdateRate : this is an optional setting to configure the rate at which Skyreal VR will retrieve inputs from VRPN (the default value if no setting is given 120Hz)
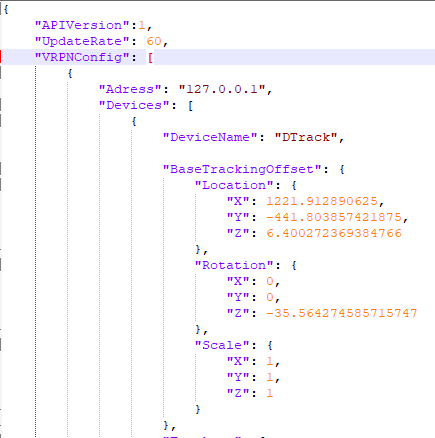
You then need to write the VRPNConfig array, this array contains the sources you receive tracking and input from.
To create a source, it need to have an Adress field. This is the ip adress of the computer where the VRPN Server runs.
Devices
For a same Adress, you can have an array of Devices : a device consist mainly of its DeviceName, corresponding to the name of the device given in vrpn.cfg : for example DTrack or XInput0.
For a device receiving tracking values, you can add a BaseTrackingOffset value to change the tracking values received from the tracking system : for example if the tracking origin is too high/too low, if the tracking system values need to be scaled by a factor of 10, ... You can have Location, Rotation and Scale settings.
You can then setup the type of inputs you will receive from this Device : these can be arrays of Trackers, Buttons, or *Axis :
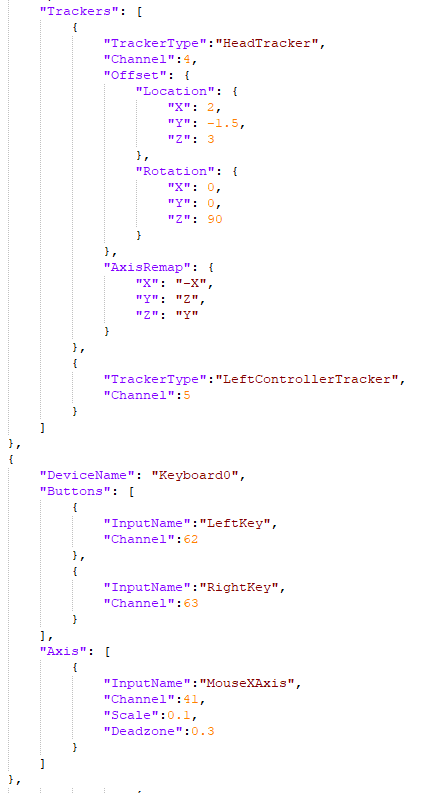
Trackers
For each Tracker, here are the settings you can configure :
TrackerType : How the tracker will be used in Skyreal VR, the values can be HeadTracker, LeftControllerTracker, RightControllerTracker or AdditionalTracker.
Channel : The channel on which VRPN sends this tracker data.
AxisRemap : This setting can be used when tracking data sent by VRPN is not sent in the same coordinate system as Unreal. For ART Tracking, this is usually X = Y and Y = X.
Offset : you can tell Skyreal VR to offset the controller meshes inside Skyreal VR from the data received from VRPN, either by Location or Rotation.
Buttons and axis
For Axis and Buttons, the main settings are the same :
InputName : the name of the Input triggered in Skyreal VR when this button is pressed. A list of all the input names can be found at the bottom of the page.
Channel : The channel on which VRPN sends this data.
Axis also have additional settings, such as :
Deadzone : to have a deadzone on the axis values received by vrpn
Scale : to put a scale on the axis values received by vrpn. A scale of -1 can be useful to invert an axis.
Deck configuration
Finally, to be able to launch Skyreal VR in Cave / Powerwall mode through deck, you need to edit the CaveSettings section in deck.json. The settings you need to set are as follow :
NdisplayPath : Path to the .ndisplay config file previously created
VrpnConfigPath : Path to the .json skyreal config file previously created
RenderingMode : How you want the image to be rendered on your screen. The values can be Mono (no 3D), SideBySide and TopBottom for stereo settings as well as FrameSequential.

Starting Skyreal VR
With this setup done the Play In CAVE button should now appear in deck, with option to launch or join a collab session as well.

Troubleshooting
- There is a known in Unreal 5.2 where the stereo rendering mode FrameSequential is not working as expected. Please try other stereo rendering options.
If you are having other issues with your powerwall configuration, please contact the Skyreal VR support team.
Input Names
Buttons
Mostly used :
These are the buttons for opening the Pie Menu on the right and left controller :
VrMenuButtonRightController VrMenuButtonLeftController
These are the main interaction buttons on the right and left controller :
ActionButtonRightController ActionButtonLeftController
These are buttons to increase and decrease the camera speed :
IncreaseSpeed DecreaseSpeed
These are bindings if you want to move using buttons instead of sticks :
LeftControllerUp LeftControllerDown LeftControllerLeft LeftControllerRight RightControllerUp RightControllerDown RightControllerLeft RightControllerRight
These are custom buttons that you can use in your own projects
VRPNInputAction*
Complete list :
VrMenuButtonRightController
VrMenuButtonLeftController
ActionButtonRightController
ActionButtonLeftController
ClickMouseRightButton
ClickMouseLeftButton
ClickMouseMiddleButton
RightKey
LeftKey
UpKey
DownKey
AnyKey
EnableMoveRightController
EnableMoveLeftController
CtrlButton
GamepadA
GamepadB
GamepadY
LeftControllerUp
LeftControllerDown
LeftControllerLeft
LeftControllerRight
RightControllerUp
RightControllerDown
RightControllerLeft
RightControllerRight
VRPNInputAction1
VRPNInputAction2
VRPNInputAction3
VRPNInputAction4
VRPNInputAction5
VRPNInputAction6
VRPNInputAction7
VRPNInputAction8
VRPNInputAction9
IncreaseSpeed
DecreaseSpeed
SelectAll
ExitVrActionButton
TutorialButton
IncreaseCameraSpeed
DecreaseCameraSpeed
CompassXAxis
CompassYAxis
CompassZAxis
LogButton
CompassGrab
CompassRot
HideToggle
PauseMenu
ShowPartInfo
OpenRightMenu
Remove
FitTo
Save
HandheldCamera
Ping
TakeScreenshot
Isolate
Axis
Mostly used :
These are the stick values for the right and left controller on the X and Y axis :
AxisRightController_X AxisRightController_Y AxisLeftController_X AxisLeftController_Y
These are custom axis that you can use in your own projects
VRPNInputAxis*
Complete list :
AxisRightController_X
AxisRightController_Y
AxisLeftController_X
AxisLeftController_Y
MouseXAxis
MouseYAxis
MouseScrollWheelAxis
AxisOrientation_X
AxisOrientation_Y
AxisPosition_X
AxisPosition_Y
AxisPosition_Z_P
AxisPosition_Z_M
VRPNInputAxis1
VRPNInputAxis2
VRPNInputAxis3
VRPNInputAxis4
VRPNInputAxis5
VRPNInputAxis6
VRPNInputAxis7
VRPNInputAxis8
VRPNInputAxis9